
操作系统选择Centos9,为啥不用最新的?因为这台二手测试服务器的CPU是E5-2660V2的CPU,新的Centos系统中已经对CPU指令有新要求,要求X86_64_V3起步,而这个老CPU不支持。如果不是因为买这个二手设备,我还真没意识到,原来操作系统对于CPU的挑剔和兼容问题,是真的存在。因为以前怎么装都可以,没遇到过类似问题,所以想当然了忽略了天然的指令集兼容问题。
[root@localhost ~]# cat /etc/*-release
CentOS Stream release 9
NAME="CentOS Stream"
VERSION="9"
ID="centos"
ID_LIKE="rhel fedora"
VERSION_ID="9"
PLATFORM_ID="platform:el9"
PRETTY_NAME="CentOS Stream 9"
ANSI_COLOR="0;31"
LOGO="fedora-logo-icon"
CPE_NAME="cpe:/o:centos:centos:9"
HOME_URL="https://centos.org/"
BUG_REPORT_URL="https://issues.redhat.com/"
REDHAT_SUPPORT_PRODUCT="Red Hat Enterprise Linux 9"
REDHAT_SUPPORT_PRODUCT_VERSION="CentOS Stream"
CentOS Stream release 9
CentOS Stream release 9
我们使用发行版特定方法来安装CEPH
dnf search release-ceph
dnf install --assumeyes centos-release-ceph-reef
dnf install --assumeyes cephadm
然后我们更新一下cephadm
cephadm add-repo --release reef
cephadm install
查看一下cephadm的版本
[root@localhost ~]# cephadm version
cephadm version 18.2.3 (76424b2fe1bb19c32c52140f39764599abf5e035) reef (stable)
开始创建起步节点
cephadm bootstrap --mon-ip 192.168.1.105然后。报错了。主机名有问题。因为我们虚拟机装好后,没有改过主机名。
[root@localhost ~]# cephadm bootstrap --mon-ip 192.168.1.105
Creating directory /etc/ceph for ceph.conf
Verifying podman|docker is present...
Verifying lvm2 is present...
Verifying time synchronization is in place...
Unit chronyd.service is enabled and running
Repeating the final host check...
podman (/usr/bin/podman) version 5.1.0 is present
systemctl is present
lvcreate is present
Unit chronyd.service is enabled and running
Host looks OK
Cluster fsid: dfa59dba-3948-11ef-8875-00155d016601
Error: hostname is a fully qualified domain name (localhost.localdomain); either fix (e.g., "sudo hostname localhost" or similar) or pass --allow-fqdn-hostname


        ***************
        Cephadm hit an issue during cluster installation. Current cluster files will NOT BE DELETED automatically to change
        this behaviour you can pass the --cleanup-on-failure. To remove this broken cluster manually please run:

           > cephadm rm-cluster --force --fsid dfa59dba-3948-11ef-8875-00155d016601

        in case of any previous broken installation user must use the rm-cluster command to delete the broken cluster:

           > cephadm rm-cluster --force --zap-osds --fsid <fsid>

        for more information please refer to https://docs.ceph.com/en/latest/cephadm/operations/#purging-a-cluster
        ***************


ERROR: hostname is a fully qualified domain name (localhost.localdomain); either fix (e.g., "sudo hostname localhost" or similar) or pass --allow-fqdn-hostname
按照我们的服务器列表的规划清单,设置主机名。
hostnamectl set-hostname vm-c01

#检查一下
[root@localhost ~]# cat /etc/hostname
vm-c01
继续开始安装起步节点
[root@localhost ~]# cephadm bootstrap --mon-ip 192.168.1.105
Verifying podman|docker is present...
Verifying lvm2 is present...
Verifying time synchronization is in place...
Unit chronyd.service is enabled and running
Repeating the final host check...
podman (/usr/bin/podman) version 5.1.0 is present
systemctl is present
lvcreate is present
Unit chronyd.service is enabled and running
Host looks OK
Cluster fsid: f654a492-3949-11ef-910a-00155d016601
Verifying IP 192.168.1.105 port 3300 ...
Verifying IP 192.168.1.105 port 6789 ...
Mon IP `192.168.1.105` is in CIDR network `192.168.1.0/24`
Mon IP `192.168.1.105` is in CIDR network `192.168.1.0/24`
Internal network (--cluster-network) has not been provided, OSD replication will default to the public_network
Pulling container image quay.io/ceph/ceph:v18...
Ceph version: ceph version 18.2.2 (531c0d11a1c5d39fbfe6aa8a521f023abf3bf3e2) reef (stable)
Extracting ceph user uid/gid from container image...
Creating initial keys...
Creating initial monmap...
Creating mon...
firewalld ready
Enabling firewalld service ceph-mon in current zone...
Waiting for mon to start...
Waiting for mon...
mon is available
Assimilating anything we can from ceph.conf...
Generating new minimal ceph.conf...
Restarting the monitor...
Setting public_network to 192.168.1.0/24 in mon config section
Wrote config to /etc/ceph/ceph.conf
Wrote keyring to /etc/ceph/ceph.client.admin.keyring
Creating mgr...
Verifying port 0.0.0.0:9283 ...
Verifying port 0.0.0.0:8765 ...
Verifying port 0.0.0.0:8443 ...
firewalld ready
Enabling firewalld service ceph in current zone...
firewalld ready
Enabling firewalld port 9283/tcp in current zone...
Enabling firewalld port 8765/tcp in current zone...
Enabling firewalld port 8443/tcp in current zone...
Waiting for mgr to start...
Waiting for mgr...
mgr not available, waiting (1/15)...
mgr not available, waiting (2/15)...
mgr not available, waiting (3/15)...
mgr not available, waiting (4/15)...
mgr not available, waiting (5/15)...
mgr is available
Enabling cephadm module...
Waiting for the mgr to restart...
Waiting for mgr epoch 5...
mgr epoch 5 is available
Setting orchestrator backend to cephadm...
Generating ssh key...
Wrote public SSH key to /etc/ceph/ceph.pub
Adding key to root@localhost authorized_keys...
Adding host vm-c01...
Deploying mon service with default placement...
Deploying mgr service with default placement...
Deploying crash service with default placement...
Deploying ceph-exporter service with default placement...
Deploying prometheus service with default placement...
Deploying grafana service with default placement...
Deploying node-exporter service with default placement...
Deploying alertmanager service with default placement...
Enabling the dashboard module...
Waiting for the mgr to restart...
Waiting for mgr epoch 9...
mgr epoch 9 is available
Generating a dashboard self-signed certificate...
Creating initial admin user...
Fetching dashboard port number...
firewalld ready
Ceph Dashboard is now available at:

             URL: https://vm-c01:8443/
            User: admin
        Password: ------

Enabling client.admin keyring and conf on hosts with "admin" label
Saving cluster configuration to /var/lib/ceph/f654a492-3949-11ef-910a-00155d016601/config directory
Enabling autotune for osd_memory_target
You can access the Ceph CLI as following in case of multi-cluster or non-default config:

        sudo /usr/sbin/cephadm shell --fsid f654a492-3949-11ef-910a-00155d016601 -c /etc/ceph/ceph.conf -k /etc/ceph/ceph.client.admin.keyring

Or, if you are only running a single cluster on this host:

        sudo /usr/sbin/cephadm shell

Please consider enabling telemetry to help improve Ceph:

        ceph telemetry on

For more information see:

        https://docs.ceph.com/en/latest/mgr/telemetry/

Bootstrap complete.
注意:上面自动生成的用户名和密码,要记下来,否则就悲剧了。
为了后面方便,我们安装下ceph命令行
cephadm add-repo --release reef
cephadm install ceph-common
确认一下ceph命令可用
[root@localhost ~]# ceph -v
ceph version 18.2.3 (76424b2fe1bb19c32c52140f39764599abf5e035) reef (stable)
我们查看一下ceph集群的状态
[root@localhost ~]# ceph status
  cluster:
    id:     f654a492-3949-11ef-910a-00155d016601
    health: HEALTH_WARN
            OSD count 0 < osd_pool_default_size 3

  services:
    mon: 1 daemons, quorum vm-c01 (age 9m)
    mgr: VM-C01.dbarmi(active, since 84s)
    osd: 0 osds: 0 up, 0 in

  data:
    pools:   0 pools, 0 pgs
    objects: 0 objects, 0 B
    usage:   0 B used, 0 B / 0 B avail
    pgs:
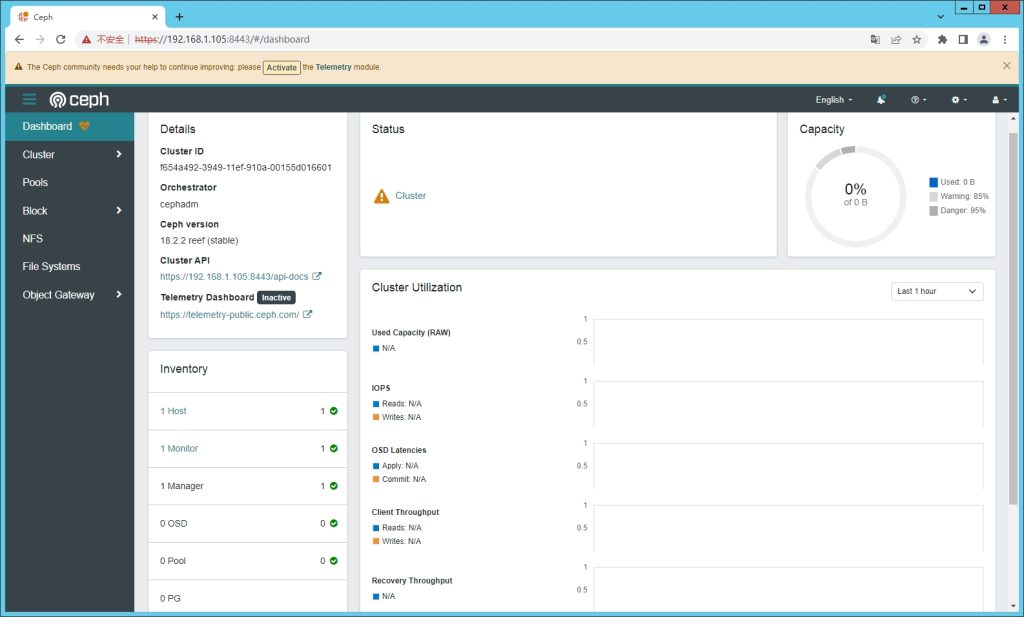
[root@localhost ~]# 看着安装成功。我们访问下试试看。https://192.168.1.105:8443/
某些浏览器的SSL会报错,换个浏览器试试即可,Firefox不行就换Chrome,找个可以访问的。看到了可爱的登录界面

首次登录需要修改初始密码。

可以登录进去看到我们的面板了。
一切才刚刚开始。